Friday, November 16, 2018

WEEK 34: COMPLETING PROJECT THESIS

OBJECTIVE
  1. To do corrections for chapter 1, 2 and 3.
  2. To compile all chapters.
  3. To complete the project thesis.
METHODOLOGY
  1. Correcting any changes made on chapter 1,2 and 3.
  2. Compiling all chapters.
  3. Completing project thesis by following the FYP thesis template.
  4. Discuss with supervisor regarding any add up or correction need to be made.
RESULT

The figure below is the cover page and front page of my thesis. 

COVER PAGE AND FRONT PAGE

ANALYSIS/DISCUSSION


The figure above shows the cover page and front page of my project thesis. The thesis have been verify by Sir Zaki. The complete thesis of my project have 112 pages including appendices.

CONCLUSION


In conclusion, this week objective was achieved. The cover page and front page is edited from the FYP template. Finally, my thesis is complete thus, my final year project for my degree also successfully accomplished.

Thursday, November 8, 2018

WEEK 33: CHAPTER 5: CONCLUSIONS AND RECOMMENDATIONS

OBJECTIVE
  1. To write a complete thesis of conclusions and recommendations for FYP 2.
METHODOLOGY
  1. Discuss with supervisor on how to write conclusions and recommendations for FYP.
  2. Follow the FYP report template given by the UniKL to help writing conclusions and recommendations.
  3. Write the overall conclusions for my FYP.
  4. Give a recommendations regarding improvement that can be made for my FYP.
  5. Produce a complete conclusions and recommendations thesis.
RESULT

The figures below are the complete conclusions and recommendations after discussed with my supervisor.

CONCLUSIONS AND RECOMMENDATIONS

ANALYSIS/DISCUSSION

Chapter 5 is the overall conclusions for the prototype quadruped robot. Chapter 5 also contains the recommendations in order to improve the quadruped robot. This is the complete chapter 5: Conclusions and Recommendations after discussed and approved by my supervisor, Sir Zaki.

CONCLUSION


In conclusion, this week objective was achieved. Chapter 5 is to shows to the readers the overall conclusions and also to give the readers suggestions to improve the quadruped robot to achieve its purpose as a search and rescue robot. 

Friday, November 2, 2018

WEEK 32: CHAPTER 4: RESULTS AND DISCUSSIONS

OBJECTIVE
  1. To write a complete thesis of results and discussions for FYP 2.
METHODOLOGY
  1. Discuss with supervisor on how to write results and discussion for FYP.
  2. Follow the FYP report template given by the UniKL to help writing results and discussions.
  3. Gather every results obtain from the quadruped robot prototype.
  4. Write an understandable discussions of my FYP.
  5. Produce a complete results and discussions thesis.
RESULT

The figures below are the complete results and discussions after discussed with my supervisor.


RESULTS AND DISCUSSIONS

ANALYSIS/DISCUSSION

Chapter 4 is produce after gathering all the data from the prototype quadruped robot. This is the complete chapter 4: Results and Discussions after discussed and approved by my supervisor, Sir Zaki.

CONCLUSION


In conclusion, this week objective was achieved. Chapter 4 is to shows to the readers the results that obtained from the quadruped robot prototype and the discussions of an the explanation regarding the hardware and software results. 

Thursday, October 25, 2018

WEEK 31: EXHIBITION DAY

OBJECTIVE
  1. To present my quadruped robot prototype on the Exhibition day.
  2. To explain my project based on the presentation poster.
METHODOLOGY
  1. Going to the UniKL BMI Gemilang Hall before 9 am on Wednesday, October 24th.
  2. Register for presentation.
  3. Set up the poster and quadruped robot prototype.
  4. Present the project to the assessors with confident.
RESULT

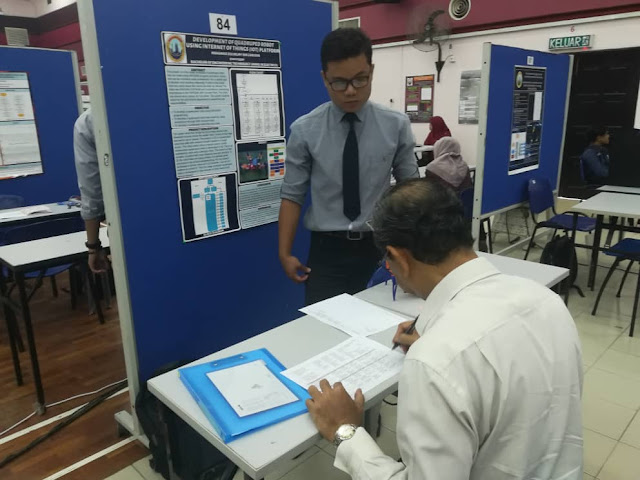
The following pictures are taken on the final year project 2 Exhibition day. 


ANALYSIS/DISCUSSION

The presentation going well. There are no problem with the project. The quadruped robot works perfectly. The assessors are satisfied with the presentation. After presenting to the assessors, I do some explanation and demonstration to the other students that interested with my project. I finish assessed at 10 am. The Exhibition day ends at 12 afternoon.

CONCLUSION

In conclusion, both of the assessors which was Professor Dr. Badri and a research engineer from UNITEN was satisfied with my presentation. The quadruped robot works perfectly without any problem. Thus, the presentation was going as planned.

Friday, October 19, 2018

WEEK 30: DESIGN POSTER AND PRESENTATION PREPARATION

OBJECTIVE
  1. To design a poster for presentation day.
  2. To do final preparation before the Exhibition day.
METHODOLOGY
  1. Design the poster using https://www.canva.com.
  2. Meet supervisor to ask for advice on doing presentation poster.
  3. Showing supervisor soft copy of poster before printing.
  4. Updating the poster according to supervisor.
  5. Print out the presentation poster.
RESULT

The presentation poster as figure below.

Presentation Poster

ANALYSIS/DISCUSSION

The poster is design using https://www.canva.com. The contents of the poster is written based on Sir Zaki wanted. After finishing the first copy of the poster, I consult Sir Zaki to as for his opinion on the poster. Then, he wanted me to do some correction. Hence, before print out the poster I consulted Sir Zaki again to see if there is any correction have to be made. The poster is print out after Sir Zaki is satisfied.

CONCLUSION

In conclusion, the presentation poster for the Exhibition day is print out. The quadruped robot prototype is fully charged and ready to present.

Monday, October 8, 2018

WEEK 29: PROTOTYPE TESTING AND TROUBLESHOOTING

OBJECTIVE
  1. To test the prototype quadruped robot.
  2. To troubleshoot the prototype quadruped robot.
METHODOLOGY
  1. Test the robot WiFi access point connection to the smartphone and laptop.
  2. Test the robot movement functionality.
  3. Troubleshoot if there is any problem countered.
RESULT

The following video is a video of testing the robot movement functionality.

Prototype limb movement testing controlling using laptop

After connecting the Wemos D1 Mini WiFi access point using laptop. The ESP8266 IP address is open through internet browser. The address are '192.168.4.1'. The quadruped controller showed up for me to control the robot.

After that, I tested the robot to walk. Eventually, the robot's leg is very slippery thus i put some glue using hot glue gun to the point of the legs to reduce it's slippery. 

Hot glue gun is used to put some glue on the end of the legs to reduce the slippery problem

After finishing putting glue on each legs of the robot. The quadruped robot is tested again. The following video show the steps to control the robot using smartphone.


Quadruped Robot walk testing

CONCLUSION

In conclusion, the robot has achieve its fully functional capability. This prototype quadruped robot is completed.

Saturday, October 6, 2018

WEEK 28: BUILD PROTOTYPE

OBJECTIVE
  1. To assemble the electronic components.
  2. To assemble the 3D printing body parts.
  3. To build the quadruped robot prototype.
METHODOLOGY
  1. Uploading the coding to Wemos D1 Mini and ARDUINO Pro Mini.
  2. Assemble the Wemos D1 Mini, ARDUINO Pro Mini and PCA 9685.
  3. Assemble the 3D printing body parts with servo motors.
  4. Connecting the servo motors to the PCA 9685 according to the port declared in the coding.
  5. Soldering the positive and negative of Li-Poly battery to the switch and DC-DC step down converter and UBEC voltage converter.
  6. Connecting the DC-DC step down converter to the Wemos D1 Mini, ARDUINO Pro Mini and PCA 9685.
  7. Connecting the UBEC voltage converter to all the servo motors.
  8. Tighten the screw and glue the components to the robot to complete build the quadruped robot.
RESULT

As a result, the following pictures are the process of assembling the quadruped robot prototype.

Assembling each leg parts with two servo motors

Screwing four servo motors to the body part

Complete assemble of 3D printing body parts with Servo motors

Complete connection of the electronic components, Li-Poly battery and the robot body

ANALYSIS/DISCUSSION

The arduino and Wemos D1 Mini was uploaded with the coding before connecting to each other and other components to avoid error from the board. The servo horn has some difficulty put because of the 3D printing leg parts has small space to put the servo horn. Hence, the servo horn is tighten to the leg using cable tie. The body of the robot has small space, it can only fit with Wemos D1 Mini, ARDUINO Pro Mini and also PCA9685. The UBEC and DC-DC step down converter was place on top of the robot, glued along with the Li-Poly battery. 

CONCLUSION

As a conclusion, the quadruped robot prototype was finish assemble and the robot is ready to be test.

Wednesday, September 26, 2018

WEEK 27: BUYING ADDITION COMPONENTS

OBJECTIVE
  1. To decide what type of components that suitable to develop my new design project.
  2. To search electronic store that sells the components that needed with a reasonable price.
METHODOLOGY
  1. Understanding the steps taken to build the quadruped robot on https://www.instructables.com/id/ESP8266-WIFI-AP-Controlled-Quadruped-Robot/
  2. Comparing the design to my 3D printed body parts and decide what components suitable for my project.
  3. Listing the addition components that need to buy.
  4. Searching the electronic store on Jalan Pasar, Pudu, Kuala Lumpur.
  5. Buying the components.
RESULT

As a result, I found one electronic store near Jalan Pasar, Pudu, KL that offer all the components needed to build my project. The named of the store is 'Online Components Sdn Bhd'. 

Online Components Sdn Bhd near Jalan Pasar

The addition components that I've bought on this store is:

WeMos D1 Mini

PCA9685 16-Channel 12-bit PWM Servo Motor Driver

Hobbywing UBEC 5V or 6V switchable max 3A

Mini DC-DC Step Down Converter

Li-Poly RC Battery 7.4V 2200mAh

Boat Button Switch

ANALYSIS/DISCUSSION

The store provide me all the addition components required for me to build my prototype. The reason why I choose these components is because: 

WeMos D1 Mini: This is the same type as NodeMCU dev kit. it has ESP8266 WiFi module but this component is a lot smaller than nodeMCU. I choose this component because of it small size so that it is fit to my robot since my robot is small. It also has less pin however, I only use 4 pins for my project. thus, less pin does not give problem to build my prototype.

PCA9685 16-Channel 12-bit PWM: This component is recommended from the project that I found in the internet. it can give addition of PWM pin to my arduino Pro Mini. This board is powered using 5V power and very useful for building a robot or proect that use many PWM servo motor.

UBEC 5V or 6V switchable max 3A: This component works as voltage regulator to 5V of 6V similar to DC to DC voltage regulator. However, it has filtering so it will reduce noise that can affected the motor glitch and it has high ampere that's enough to lift up the robot load.

Mini DC to DC Step-Down Converter: The mini DC to DC step-down converter is to regulate power from source to 5V which then can supply to the components that powered up with 5V. It has no filtering so, for this project I will not powering up servo motors with this component.

Li-Poly RC Battery: This LiPo is the main power source for my robot. It gives 7.4V power to connect to the UBEC and DC to DC step-down.

Boat Switch Button: For safety issues and power saving consumption, I will make a power switch from the LiPo using the Boat switch button since the LiPo doesn't have switch button.

CONCLUSION

In conclusion, the components to build this project have already been bought. All the components are bought with a reasonable price. Thus, I can continue to developing the quadruped robot using the addition components.

Wednesday, September 19, 2018

WEEK 26: DISCUSS WITH SUPERVISOR REGARDING THE PROJECT CHOSEN

OBJECTIVE
  1. To meet with Sir Zaki to discuss regarding the project that I selected suitable for my project.
  2. To ask for his permission and advice on continuing my project as we discussed.
METHODOLOGY
  1. Inform Sir Zaki earlier to conduct a meeting to discuss about the project that selected.
  2. Meet him at his office within the week.
  3. Discuss the project and explaining to him why this project can relate to my project.
  4. Ask for his permission to continue building the project following the project that have been chosen.
RESULT

On the discussion session, I explain to him that this project can be done but I need to buy addition components and modified the current project. I explain to him that this project doesn't use BLYNK application however it use a web browser and the ESP8266 function as the WiFi Access Point.

ANALYSIS/DISCUSSION

Sir Zaki approved my plan on developing this type of project. However Sir Zaki wanted me to modified the robot. Thus, I will use my current 3D printing body parts and modified the arduino codes to match my 3D body parts design.

CONCLUSION

In conclusion, the discussion going as plan and Sir Zaki approved my project. Thus, I will continue developing the project by buying the addition components first.

Thursday, September 13, 2018

WEEK 25: FINDING ANOTHER BENCHMARK

OBJECTIVE
  1. To find more suitable project related to IoT robot.
  2. To find other ways to control quadruped robot using IoT.
METHODOLOGY
  1. Finding other suitable project related to IoT robot using internet.
  2. Finding other ways to control quadruped robot using IoT from the internet.
  3. List the selected projects obtained from the internet.
  4. Compare the selected projects with my project.
  5. Choose a more suitable and simple project that can modified according to the criteria for my project.
RESULT

As a result, there are various project found that are related to IoT robot and quadruped robot. The list below are the link of the projects obtained from the internet.
  • https://www.instructables.com/id/QUATTRO-the-Arduino-Quadruped-Robot/
  • https://www.instructables.com/id/ESP8266-WIFI-AP-Controlled-Quadruped-Robot/
  • https://oscarliang.com/arduino-quadruped-robot-stalker/
  • https://www.instructables.com/id/Synopsis/
ANALYSIS/DISCUSSION

After comparing each projects obtained from the internet as listed in the result. 
https://www.instructables.com/id/ESP8266-WIFI-AP-Controlled-Quadruped-Robot/ 
has more similar project to mine. This project use WiFi to control the robot. The robot can be control using smartphone similar to my main objective. I want to develop a quadruped robot that can be control using smartphone. However, the component that this project use slightly different than what I have bought for my previous project and the quadruped robot body is different than my 3D printed body parts that i have already printed out. The figure below are the quadruped robot from the link in the description above. Nonetheless, I can modified and comes out with different idea to build according to my design.

ESP8266 WiFi AP CONTROLLED QUADRUPED ROBOT

CONCLUSION

In conclusion, this quadruped robot is more suitable for me to imitate because it is similar to my project however this robot did not use BLYNK application to control the robot but it use web browser to control the robot and the ESP8266 works as WiFi access point for smartphone to interface.

Thursday, August 30, 2018

WEEK 24: DISCUSS WITH SUPERVISOR REGARDING PROBLEM FACED

OBJECTIVE
  1. To meet with Sir Zaki to discuss regarding the problems I faced.
  2. To ask his advice for my project.
METHODOLOGY
  1. Inform Sir Zaki to organised a discussion meeting within this week.
  2. Meet him at his office in 5th Floor of UniKL BMI academic building.
  3. Discuss regarding the problems I faced while developing my project.
  4. Ask for any advice regarding my final year project.
RESULT

In the meeting session with Sir Zaki, I explain to him what is my problems by showing him my coding that I develop to interface the robot with BLYNK application was impossible for me due to my limitation knowledge of arduino and BLYNK application interface. 

ANALYSIS/DISCUSSION

Sir Zaki understand on what is the reason of my problem on developing my project. After the discussion, he inform me to find another benchmark that are more suitable to develop my project. Sir Zaki wanted me to develop same project but if there is a different method to control the robot using Internet of Things (IoT).

CONCLUSION

After the meeting, we both concluded that I need to find more suitable benchmark for me to develop the same project however I must find other method or ways to control the quadruped robot using Internet of Things (IoT).

Wednesday, August 22, 2018

WEEK 23: DEVELOP AND CODING TESTING

OBJECTIVE
  1. To develop software coding for quadruped robot.
  2. To execute and test coding.
METHODOLOGY
  1. Develop coding and modified existing coding found in the internet.
  2. Execute the codes using Arduino IDE.
  3. Troubleshoot any error in the coding.
  4. Testing the coding to the hardware components.
RESULT

As a results, the existing codes obtain from 
https://www.instructables.com/id/DIY-Spider-RobotQuad-robot-Quadruped/ can't be modified or added with BLYNK application coding. The figure below shows an error while the coding was execute.

ARDUINO CODE TEST USING ARDUINO IDE SOFTWARE

ANALYSIS/DISCUSSION

The codes obtained from the internet can't be interfaced with the BLYNK application codes. The BLYNK application can't control the robot due to to many servo motors are use at the same time. The BLYNK application can only be interfaced if controlling one, two or more at once. Thus, for this type of project the BLYNK application is not suitable for controlling the quadruped robot. This is also due to my limitation of knowledge on using BLYNK application and arduino.

CONCLUSION

As in conclusion, I have to meet and discuss with my supervisor to inform of the problems that I faced when developing my project.

Friday, August 17, 2018

WEEK 22: PRINTING 3D PRINTED BODY PARTS (3)

OBJECTIVE
  1. To observe all the remaining 3D body parts.
  2. To eliminate the supporting pillar and smoothing the remaining 3D body parts.
  3. To collect all the 3D body parts.
METHODOLOGY
  1. Go to the 3D printing service to observe the remaining 3D printing body parts.
  2. Eliminate the supporting pillar using scrapper.
  3. Smoothing the remaining 3D body parts using sand paper.
  4. Collecting all the finishes 3D body parts.
RESULT

The figure below is the remaining 3D body parts that have been printed and smoothed. 

Some of the remaining 3D body parts have been clean using scrapper

ANALYSIS/DISCUSSION

All the 3D printing body parts have been smoothed and collected from sir Azman. The total of 3D printing service for my project is RM96.00 since the rate price introduce by sir Azman is according to the weight of the project which is 1g equal to RM1. My 3D body parts total weight is 96g. 

CONCLUSION

In conclusion, the 3D printing part for my project is done. All the body parts have been completely printed. Thus, now I can continue to develop my project.

Friday, August 10, 2018

WEEK 21: PRINTING 3D PRINTED BODY PARTS (2)

OBJECTIVE
  1. To observe the 3D printing body parts.
  2. Cleaning the finish body parts.
METHODOLOGY
  1. Go to the 3D printing service to observe the printing body parts.
  2. Cutting the supporting pillar for the finishes body part.
  3. Smoothing the edge of the finishes body parts.
RESULT

The figures below are the printing process of my 3D body parts. However there are no picture of me cutting and smoothing the finishes body parts since there is no one can take my picture.


3D printing body parts for quadruped robot

ANALYSIS/DISCUSSION

The figures above show my observation of the 3D printing body parts of my quadruped robot. For each body parts take about 2 to 4 hours to finish. Thus, it takes a lot of time to finish my whole body parts project.

CONCLUSION

As a conclusion, the finishes body part's supporting pillar have been eliminate using cutter and then it is smooth using sand paper. However, only 60% of my body parts have been finish for this week since the printing takes a lot of time. Sir Azman told me to collect them after all the parts have been finish by next week.

Friday, August 3, 2018

WEEK 20: PRINTING 3D PRINTED BODY PARTS (1)

OBJECTIVE
  1. Meeting with the lecturer of UniKL BMI that handle the 3D printing service.
  2. Discussing the 3D printed body parts and any problem related to it.
METHODOLOGY
  1. Contacting Sir Azman, who is the lecturer that handle the 3D printing service in UniKL BMI.
  2. Meeting with him at the 3D printing service.
  3. Discuss with him about the 3D printed body parts.
  4. Set the due date to collect the 3D printed body parts.
RESULT

On 2nd August 2018, I contacting Sir Azman to ask about 3D printing service. Then, he ask me to send my 3D printed body parts softcopy through his email. 2 days after we meet up to discuss about my project at the 3D printing service located at floor 3 of UniKL BMI academic building. Sir Azman predict my project can probably be finish next week or two more weeks since there is a lot of students using the 3D printing service.

ANALYSIS/DISCUSSION

The meeting were concluded according my expectation. since, my 3D printed body does not have any trouble to make beside one thing the 3D printing machine can not print something tangled thus the requirement body part must have support from the base like a pillar means after finishing the printing I have to eliminate the pillar using pocket knife or anything sharp. Other than that, my body parts have no trouble to print. However, the due date to finish my 3D printed body parts is not what I expected. Since, I expect it will finish within this week or next week but after Sir Azman explanation, I understand and agree with it.

CONCLUSION

In conclusion, my 3D printed body parts can be collect in the next week or two more weeks after it finishes then Sir Azman will contact me.

Wednesday, July 25, 2018

WEEK 19: COMPONENT TESTING

OBJECTIVE
  1. To test each component that have been bought.
  2. Testing it's functionality and connection.
METHODOLOGY
  1. Test the functionality for each component. The Arduino Pro Mini is soldered with male pin header strip black. A blink coding is uploaded to test if the arduino is working.
  2. For servo motor, it is connected to the arduino Pro Mini that have been upload with sweep motor coding. All the servos is function.
  3. An ESP8266 blink code is uploaded to the NodeMCU to test it's functionallity.
  4. A power supply battery is connected to the input of MB102 Breadboard power supply and a multimeter is connected to the output to measure the correct voltage output. 
RESULT
  1. The arduino Pro Mini can be uploaded with the coding from Arduino IDE software and the testing result is as expected. 
  2. All the servo motors turns according to the code sketch from the arduino. 
  3. The NodeMCU have been test using blink coding for ESP8266, and the light from NodeMCU blinking as commanded. 
  4. The output voltage from breadboard power supply is measured using multimeter and the readings is the similar to the stated voltage output on the board.
ANALYSIS/DISCUSSION

There are slightly problem when trying to test the arduino Pro Mini since the arduino Pro Mini must be program using FTDI to connect to my computer, but after I buy the CP2102 USB to TTL to connect the Pro Mini to the computer the test can be carried out. 

6 in 1 CP2102 USB to TTL 

CONCLUSION

All the components have been tested and the result from the test is as expected. The components are working perfectly.

Monday, July 16, 2018

WEEK 18: BUYING COMPONENTS

OBJECTIVE
  1. To survey a suitable and cheap price electronic store around Johor.
  2. To buy all the components needed to build this project.
METHODOLOGY
  1. Survey the store using internet search.
  2. Compare the price and store rating of the store that found.
  3. Go to the store and purchase the components needed.
RESULT

All the components have been bought from one store in Skudai. The named of the store is Top One Technology Sdn Bhd.

Top One Technology Sdn. Bhd. located in Skudai, Johor

ANALYSIS/DISCUSSION

The components to build my project as listed in week 12: Generate costing have been bought in this store except for power bank. The overall price of the component from this store is a lot cheaper from my expectation.

CONCLUSION

In conclusion, the store provide all the components need to build this robot and the hardware of my project can be start.

Thursday, May 31, 2018

WEEK 17: SUBMIT PROPOSAL & DRAFT CHAPTER 1, 2, 3

OBJECTIVE
  1. To submit a complete proposal and draft of chapter 1, 2 and 3 of my FYP 1.
  2. To complete FYP 1 semester.
METHODOLOGY
  1. Compile the draft of chapter 1, 2 and 3.
  2. Final consultation with supervisor before submitting the proposal and draft report.
  3. Log in the UniKL VLE to submit the proposal and draft report of FYP 1.
  4. Submit the proposal and draft report with the slides presentation of my FYP.
RESULT

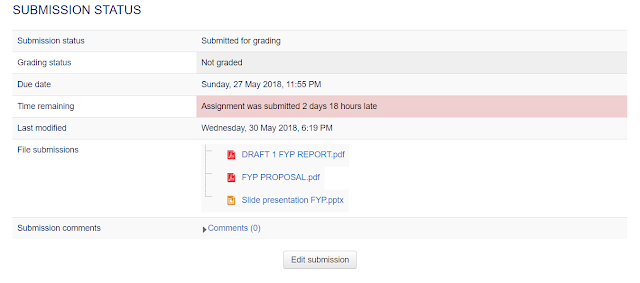
The proposal and draft report have been submitted through the UniKL VLE on May 30th, 2018. The following figure is the proof of my submission.

SUBMISSION OF PROPOSAL AND DRAFT REPORT

ANALYSIS/DISCUSSION

The proposal, draft report and slides presentation have been submitted on May 30th, 2018. The proposal, draft report and slides presentation was already submitted on May 26th, but there was some problem on submitting the draft report. The draft report should be included with the plagiarism check and after checking the plagiarism the draft report was resubmitted. The plagiarism check took a lot of time since the website to check was already full and I have to wait for other student to log out. However, it was already exceeded the due date because of mistaken submission of my draft report.

CONCLUSION

In conclusion, the objectives of this week was achieved. The proposal, draft report and slides presentation was submitted on May 30th, 2018. Although it was already exceeded the due date, my supervisor have already been notified the cause of it.

WEEK 34: COMPLETING PROJECT THESIS

OBJECTIVE To do corrections for chapter 1, 2 and 3. To compile all chapters. To complete the project thesis. METHODOLOGY Correc...